Inspired by this pattern, which is free, I decided to make one of my own.
At first, I wanted all white to match with my flowery pants.
Later on I decided to make it in 4 colors since I have 4 yanks of white yarns, 2 yanks each of dark blue, orange, and green. Then again, while doing the project many ideas came to my mind and I ended up having an opening in the front (instead of the back) with crocheted buttons, as you can see in the picture. You can have it as a design or really an opening for easy fitting in.
The pattern is somewhat confusing at first. It took me a while to figure out how to start.
Since I have done it, I'll try to guide you through this design for you to follow the pattern with ease.
Click the link above for the pattern.
But you can follow mine if you find it easier to follow.
Because we don't usually find the exact materials that are recommended for a project, we need to try whether the size fits our size or not. It requires addition, multiplication, and sometimes subtraction to get the proper measurement for our body size. Since this project was finished quite a long time ago, I struggle to recall how I made the entire thing. But because the pattern is available for free, what I will do is guide you through the confusing parts of this project.
Looking at the pattern (I suggest you to copy and paste it where you can access it anytime), here'swhat you should do:
PETAL PATTERN


The pattern is somewhat confusing at first. It took me a while to figure out how to start.
Since I have done it, I'll try to guide you through this design for you to follow the pattern with ease.
Click the link above for the pattern.
But you can follow mine if you find it easier to follow.
 |
| ~front~ |
Looking at the pattern (I suggest you to copy and paste it where you can access it anytime), here'swhat you should do:
Notes:
- I used 4-ply acrylic and 4mm crochet hook (3 yanks white, 1 yank each dark blue, orange, & green); 3 old semi-flat buttons; sewing needle and thread
- yo - yarn over the hook
- Sc2tog: Draw up a lp in each of the next 2 sts, yo and draw through all lps on hook.
- 3-dc cluster: (yo, insert hook in st, yo and draw up a loop, yo and draw through 2 loops on hook) 3 times in specified st, yo and draw through all loops on hook.
Foundation chain of 52. (Your first petal pattern). Hdc (half double crochet) in 3rd chain from hook, (loop on hook counts as 1st). Hdc across. Ch2 (counts as 1st hdc of next row). Turn.
- Skip row 1, and continue working on row 2. Maintain that 51 sts
- Row 1. Sk first dc, *hdc in next ch-1 sp, hdc in next dc; rep from * across. Ch 2, turn.
- Row 2. Skip first hdc, then hdc in each hdc across. Ch3 (counts as 1st dc of next row). Turn.
- Row 3: Sk first hdc, *work 3-dc cluster in next hdc, ch 3, work 3-dc cluster in top of cluster just made (see pictures below), sk next 2 hdc; rep from * across, end 3-dc cluster in next hdc, dc in last hdc -- 17 vertical cluster, 16 horizontal cluster. Ch 3, turn.


- Row 4: Sk first dc, work 3-dc cluster in top of first cluster, *ch 2, sk next horizontal cluster, 3-dc cluster in next cluster; rep from * across, end dc in 3rd ch of turning ch -- 17 cluster, 16 ch-2 sps. Ch 2, turn.
- Row 5: Sk first dc, hdc in first cluster *work 2 hdc in next ch-2 sp, hdc in next cluster; rep from * across, end hdc in 3rd ch of turning ch-3. Ch 2, turn.
- Row 6: Work as for Row 2, except work ch 4 (counts as first dc and ch-1 at beg of next row) to turn at end of row.
- Row 7: Sk first 2 hdc, *dc in next hdc, ch 1, sk next hdc; rep from * across, end dc in turning ch-2--25 ch-1 sps. Ch 4, turn.
- Row 8: Sk first dc and ch-1 sp, *dc in next dc, ch 1; rep from * across to last sp, end sk next ch, dc in next ch. Ch 2, turn. (This last ch 2 must be of different color, if you are making this pattern with varied colors. To do that, on the last ch of the last dc -one highlighted in row 8, instead of drawing the same color, draw a yarn of different color, then tie both yarn ends together as tight as possible to avoid your work from getting unfastened later on).
- Repeat rows 1-8 for Petal Pattern. Make 14 repeats of this Petal Pattern. I only made 11 in mine, enough to have a wrap around from waist to middle thigh.
Next.
Now, for DRAWSTRING BAND, you can follow the original pattern. In my project, instead of sc in row 2 and 5, I did dhc. Read below.
- With WS (wrong side) together, connect foundation ch edge and last row of the last Petal Pattern by working sl st in each st across, working through both pieces at once (looks like a tube and the back seam is formed).
Now, for DRAWSTRING BAND, you can follow the original pattern. In my project, instead of sc in row 2 and 5, I did dhc. Read below.
- Round 1: With RS (Right Side) facing, join thread of your choice (if doing in multi-colored) with sl st at back seam on one end of Torso tube; work 14 sc along each 8-row repeat of Petal pattern as follows; 2 sc along Rows 1-2; 5 sc along Rows 3-4; 2 sc along Rows 5-6; 5 sc along Rows 7-8; join with sl st to first sc. (14 sc X 11 repeats of Petal pat=154 sts)
- Round 2: Ch 1, hdc in each sc, and at the same time dec 4sc evenly spaced by working hdc2tog, join with sl st to first hdc. (150 sts or multiples of 5)
- Round 3: Ch 3 (counts as first dc); dc in next hdc; ch 2; sk next 2sc, *dc in each of the next 2 hdc, ch 3, sk next 2 sc; rep from * around, join with sl st to 3rd ch of beg ch-3.
- Round 4: Ch 1, work sc in each dc and 2 sc in each ch-2 sp, join with sl st to first sc.
- Round 5: Ch 1, hdc in each sc and at the same time dec (sc2tog) 9 sc evenly spaced around, join with sl st to first hdc. (141 sts or multiples of 7 + 1)
Next.
SCALLOP PATTERN (needs multiple of 7 + 1)
- Row 1 (RS): Sc in first st, *sk 2 sts, 5 dc in next st -- scallop made; sk 2 sts, sc in next st; rep from * across. Ch 3, turn.
- Row 2: Work 2 dc in first sc, *sc in center dc of next scallop, scallop in next sc; rep from * across, end sc in center dc of next scallop, 3 dc in last sc. Ch 1, turn.
- Row 3: Sc in first dc, *scallop in next sc, sc in center dc of next scallop; rep from * across, working last sc in 3rd ch of turning ch-3. Ch 3, turn.
- Repeat Rows 2 - 3 for Scallop patern
- Work back and forth in Scallop pattern till desired length is achieved, changing colors if preferred. Fasten off. (This opening can be a back or front opening. If back opening is preferred, I suggest to use flat buttons so it doesn't hurt when lying down or sitting against a chair or wall).
 |
| ~21 rows of scallop pattern, sc and wsc for button edges~ |
STRAP
(Remember that I used 4mm crochet hook)
- Foundation chain of 55.
- Row 1: Hdc on the 3rd ch from hook and in each across =54 hdc total. Ch2. Turn.
- Row 2:Sk first hdc, hdc in each st across.
- Row 3-4: Refer to Petal Pattern rows 3-4
- Row 5: Refer to row 5 of Petal pattern. Ch 2, turn.
- Row 6: Sk 1st hdc, then hdc in next 10 hdc, dc in next 11 hdc, tr in next 10 hdc, dc in next 11 hdc, and hdc in last 11 hdc.
- Row 7: Sc in first 2sts, *sk next 2 hdc, 3 dc in next hdc, then (ch 5, sl st in 5th ch from hook) 3 times to form a triple picot (see picture below); sk next hdc, 3 dc in next hdc, sk next 2 hdc*; sc in next hdc; repeat from * to *; sc in last 2sts. Fasten off.
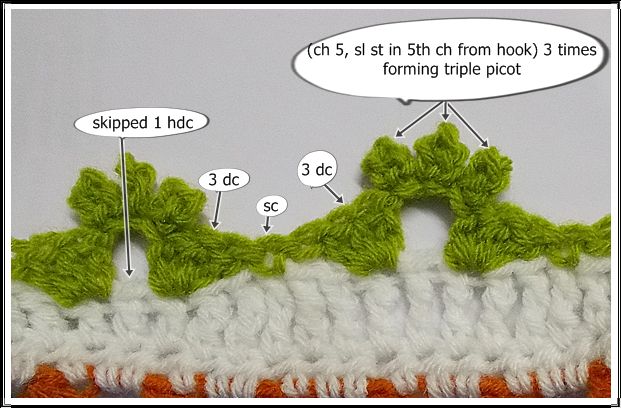 |
| ~example of row 7* ~ |
LOWER BORDER
- Round 1: Refer to row 1 of Drawstring Band except that instead of sc, work in hdc= 154 sts
- Round 2: Ch 2 (counts as first hdc); sk first hdc, hdc in each hdc around, join with sl st to top of beginning ch-2.
- Round 3: Ch 4 (counts as first dc and ch-1 sp); sk first 2 hdc, *dc in next hdc, ch 1, sk next hdc; repeat from * around, join with sl st to 3rd ch of beg ch-4.
- Round 4: Ch 4, sk first dc, *dc in next dc, ch 1; repeat from * around, join with sl st to 3rd ch of beg ch-4.
- Rounds 5-7: Refer to round 4.
 |
| ~lower border~ |
- Round 8: Ch 2 (counts as first hdc); sk first dc, hdc in each ch-1 sp and dc around, skipping 2 hdc evenly spaced around; join with sl st to 2nd ch of beg ch-2. (=152 sts).
- Round 9: Ch 1, sc in first hdc, *sk next 2 hdc, 3 dc in next hdc, (ch 5, sl st in 5th ch from hook) 3 times -- triple picot formed; sk next hdc, 3 dc in next hdc, sk next 2 hdc**, sc in next hdc; rep from * around; join with sl st in first sc. Fasten off.
EDGING FOR FRONT OPENING
- For upper side where button holes are made, I did sc evenly for 1st row.
- For 2nd row, I did a wsc or wrapped single crochet (click the link for a video tutorial) with chaining 3 in right places where I intended to place the buttons. Depending on how big your button, you can chain 4 or 5.
- For the underside, sc evenly in 1st row; then wsc for as many rows you like to have an extra layer (mine has 3 rows of wsc). Sew in buttons in place to correspond to button holes. Just sew in the extra edge of wsc layer made.
 |
| ~back side of the top~ |
Notes:
~You need a lining for inside or any plain sleeveless top.
~You can insert a ribbon as drawstring or a single crocheted band.
~Try the garment on before sewing the strap to get the proper place where to attach the edge to the tube.
~For crocheted buttons, I got the idea from this site.
~For any clarification, just leave a message. I'll try to answer them as possible as I can.
 |
| ~the final look~ |
Do take a look at my other crochet stuffs!
No comments:
Post a Comment